
This guide is written for the designer preparing printed components for a collection kit. It covers the four things Supera builds into most kits: stickers and labels, box sleeves, instructions for use, and 8.5 x 11 inserts. The numbers here are the artwork specifications for packaging that Supera prints or has printed, so a file built to them moves straight to proof.
Most artwork comes back for one of three reasons: no bleed, text sitting on a fold, or a logo supplied at screen resolution. All three are cheap to avoid at the start of design and expensive to fix after a kit is quoted. If you are designing for an at-home testing program, where a patient opens the box without any help from a clinician, legibility and fold orientation matter more than they do on a retail carton.
Before you start, ask for the template. Every program has a label template or a dieline that sets the finished size. Designing to a guessed size is the single most common cause of a reprint. Request yours from clientservice@superafulfillment.com before the first layout.
What every file needs
These apply to all four component types.
| Requirement | What to supply |
|---|---|
| File format | Print-ready PDF, with PDF/X-1a or PDF/X-4 preferred. Native Illustrator or InDesign files are accepted when packaged with all fonts and linked images. |
| Color | CMYK for anything printed in color. Call out spot colors by Pantone number rather than approximating them on screen. Set small black text in 100% K. |
| Resolution | Vector for logos and text. Raster images at 300 ppi minimum at final printed size, and 600 ppi for stickers and labels. |
| Fonts and links | Outline all text or embed the fonts in the PDF so nothing substitutes at print. Embed linked images rather than leaving them linked. |
| Bleed and safe zone | Carry background color and images past every trim edge by the bleed listed for that item. Keep text and logos inside the safe zone. |
| Variable data | Leave the reserved area on the template blank. Lot numbers, expiration dates, kit IDs, and the barcodes Supera prints are applied in production. A static barcode you supply, such as a UPC, should be vector, 100% K, with its full quiet zone. |
| One item per file | Each sticker, sleeve, IFU, and insert is its own file. Do not combine items or split one item across several files. |
| No patient information | Artwork and sample files must never contain patient names or identifiers. |
Name files Company_Kit_Item_RevN.pdf and send them to clientservice@superafulfillment.com with a list of any Pantone colors used.
Stickers and labels
Label sizes are set by the program, and Supera supplies a size template for each one. Build on the template rather than recreating the dimensions.
- Bleed: 1/16 in. on every side.
- Safe zone: 1/8 in. inside the trim.
- Resolution: 600 ppi at final size. Vector PDF is preferred; PNG or TIFF at full resolution is accepted.
- Minimum type: 6 pt.
- Color: full color, printed in house on an Epson ColorWorks color label printer. Variable data such as lot, expiry, and barcodes prints in black.
The 5 x 3 in. white box logo label
When a kit ships in a white box with a logo label, that label is a fixed size: 5 in. wide by 3 in. tall, landscape. It prints in full color in house on the Epson ColorWorks at 600 ppi. Build the artwork to these dimensions exactly.
| Specification | White box logo label |
|---|---|
| Finished size | 5 in. wide x 3 in. tall, landscape |
| Bleed | 1/16 in. on every side. Full file size with bleed is 5.125 x 3.125 in. |
| Safe zone | Text and logos stay 1/8 in. inside the trim, inside a 4.75 x 2.75 in. area |
| Resolution | 600 ppi at full size, which is 3075 x 1875 pixels including bleed. Vector PDF preferred. Do not upscale a low-resolution logo. |
| File format | Vector PDF, or PNG or TIFF at the pixel size above. Native AI accepted with fonts outlined. |
| Color | Full color. Supply Pantone C codes for brand colors so they can be matched on the proof. |
| Background | White, unless the label is meant to be solid color edge to edge. A solid background must carry the full bleed. |
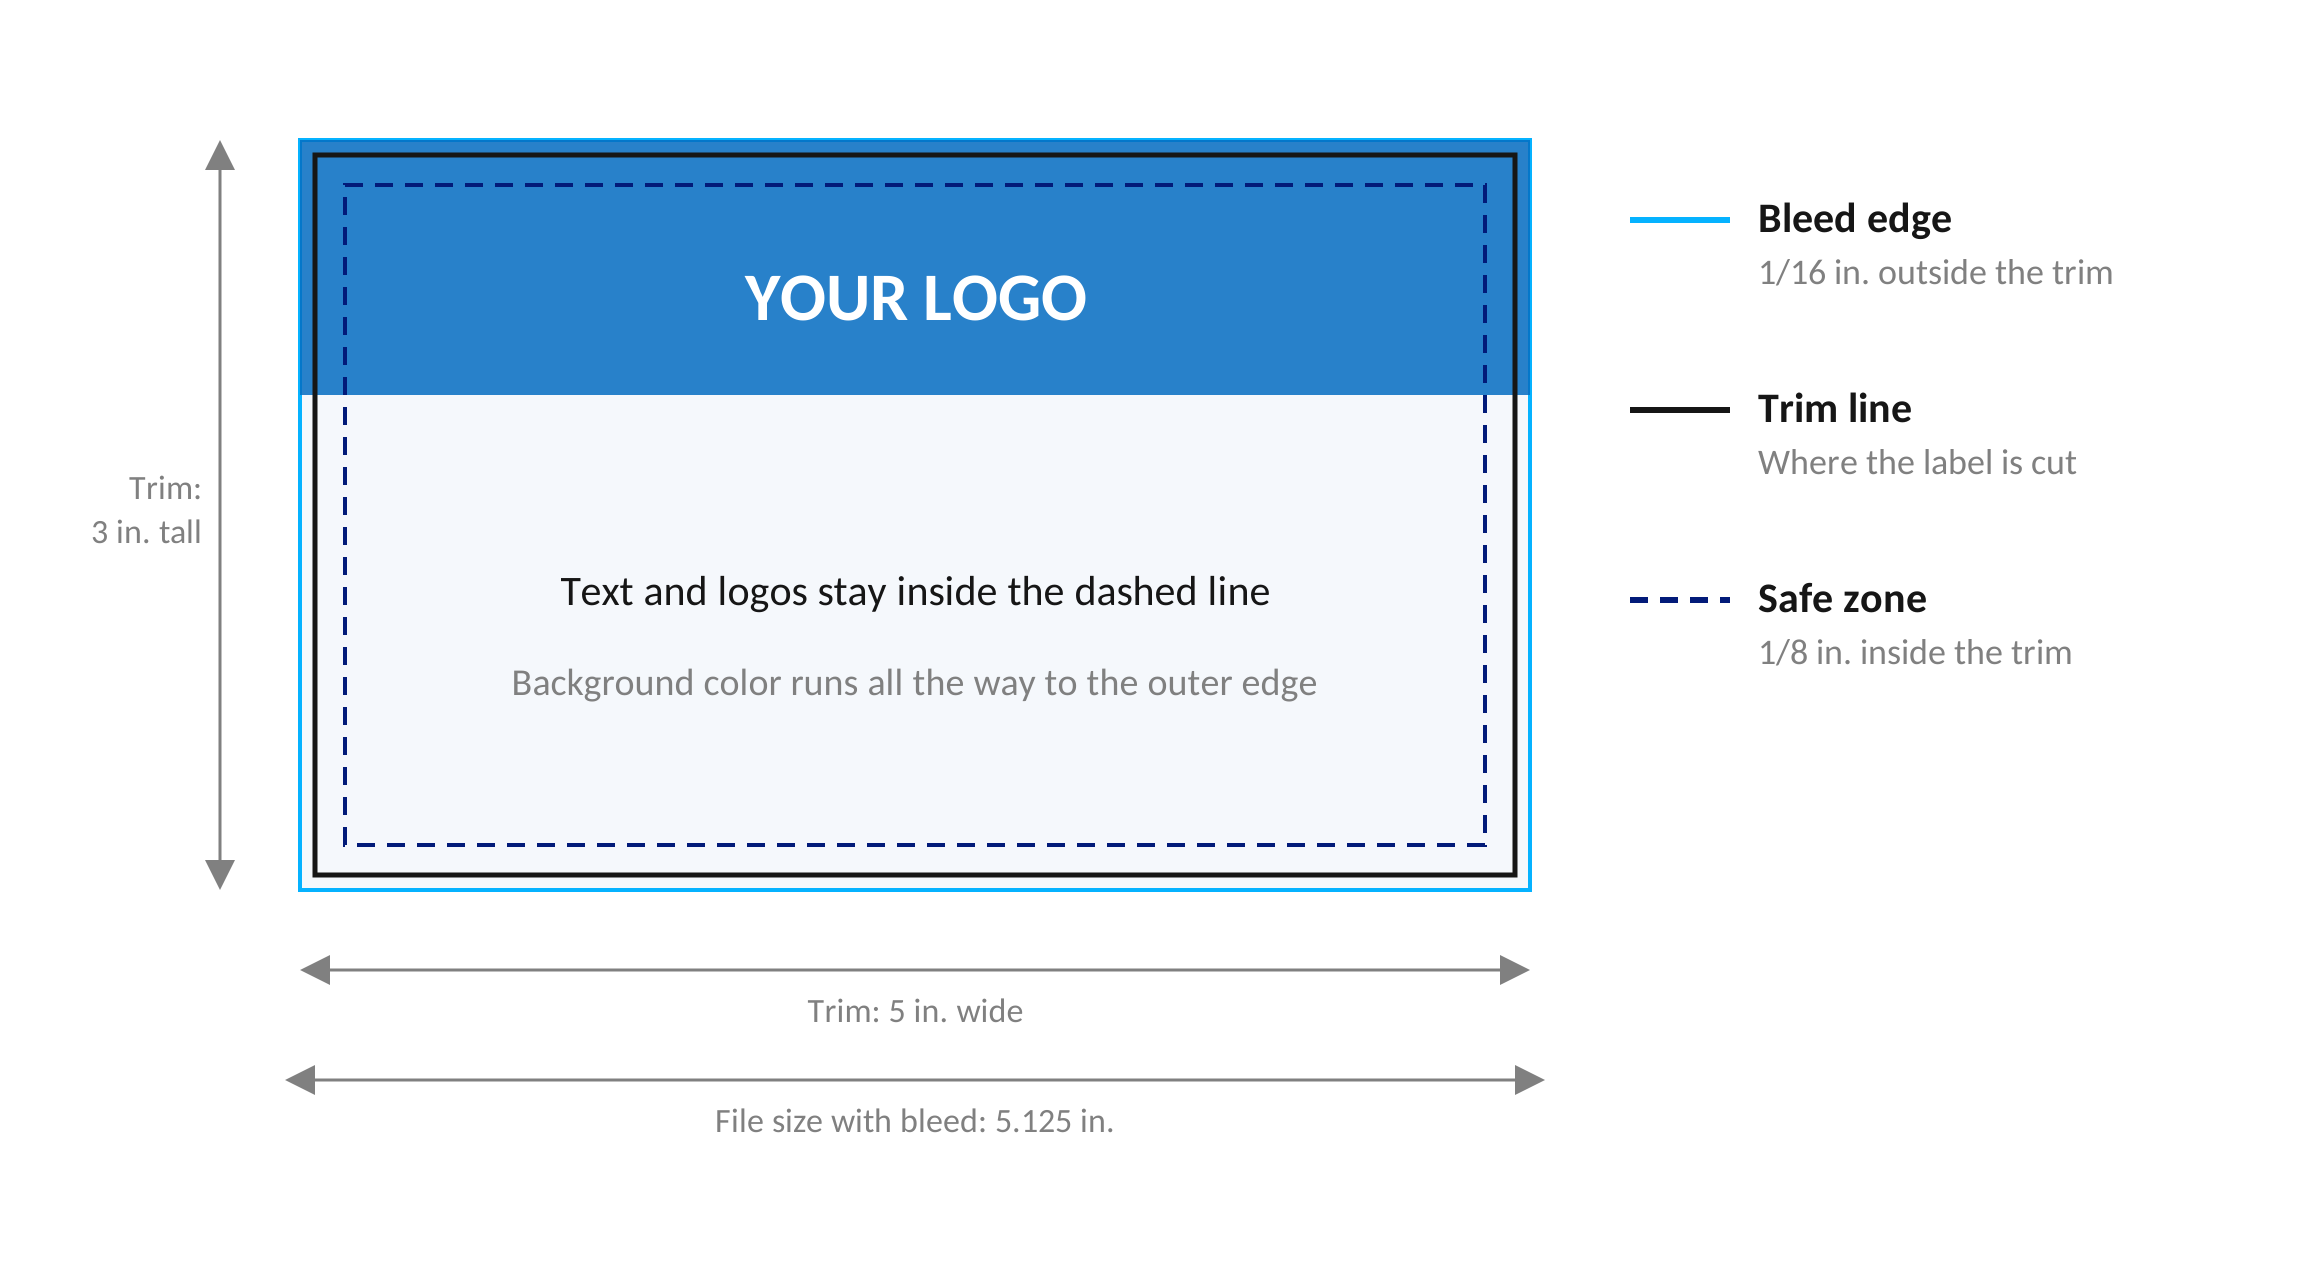
The reason for the bleed is mechanical. Cutting has a small tolerance, and if the background stops exactly at the trim line, any drift leaves a white sliver along one edge. Extending the background past the trim means the cut always lands in printed area.
Sleeves and dielines
A sleeve is printed flat and then folded, so the file has to account for both states. The finished size comes from the dieline for your kit box, which Supera or its packaging vendor supplies.
- Bleed: 1/4 in. past the dieline on every edge.
- Safe zone: 1/8 in. from every fold and cut line. Artwork that meets a fold carries through into the next panel.
- File format: Adobe Illustrator, or a layered editable PDF.
- Resolution: 300 ppi minimum for photos. Logos, text, and graphics in vector.
- Color: CMYK. List Pantone C codes for any spot color. Emboss, deboss, spot UV, and foil each go on their own layer.
- Layers: artwork on a layer named Artwork. Leave the Dieline layer in place and unchanged. Label each side as inside or outside.
- Minimum type: 6 pt.
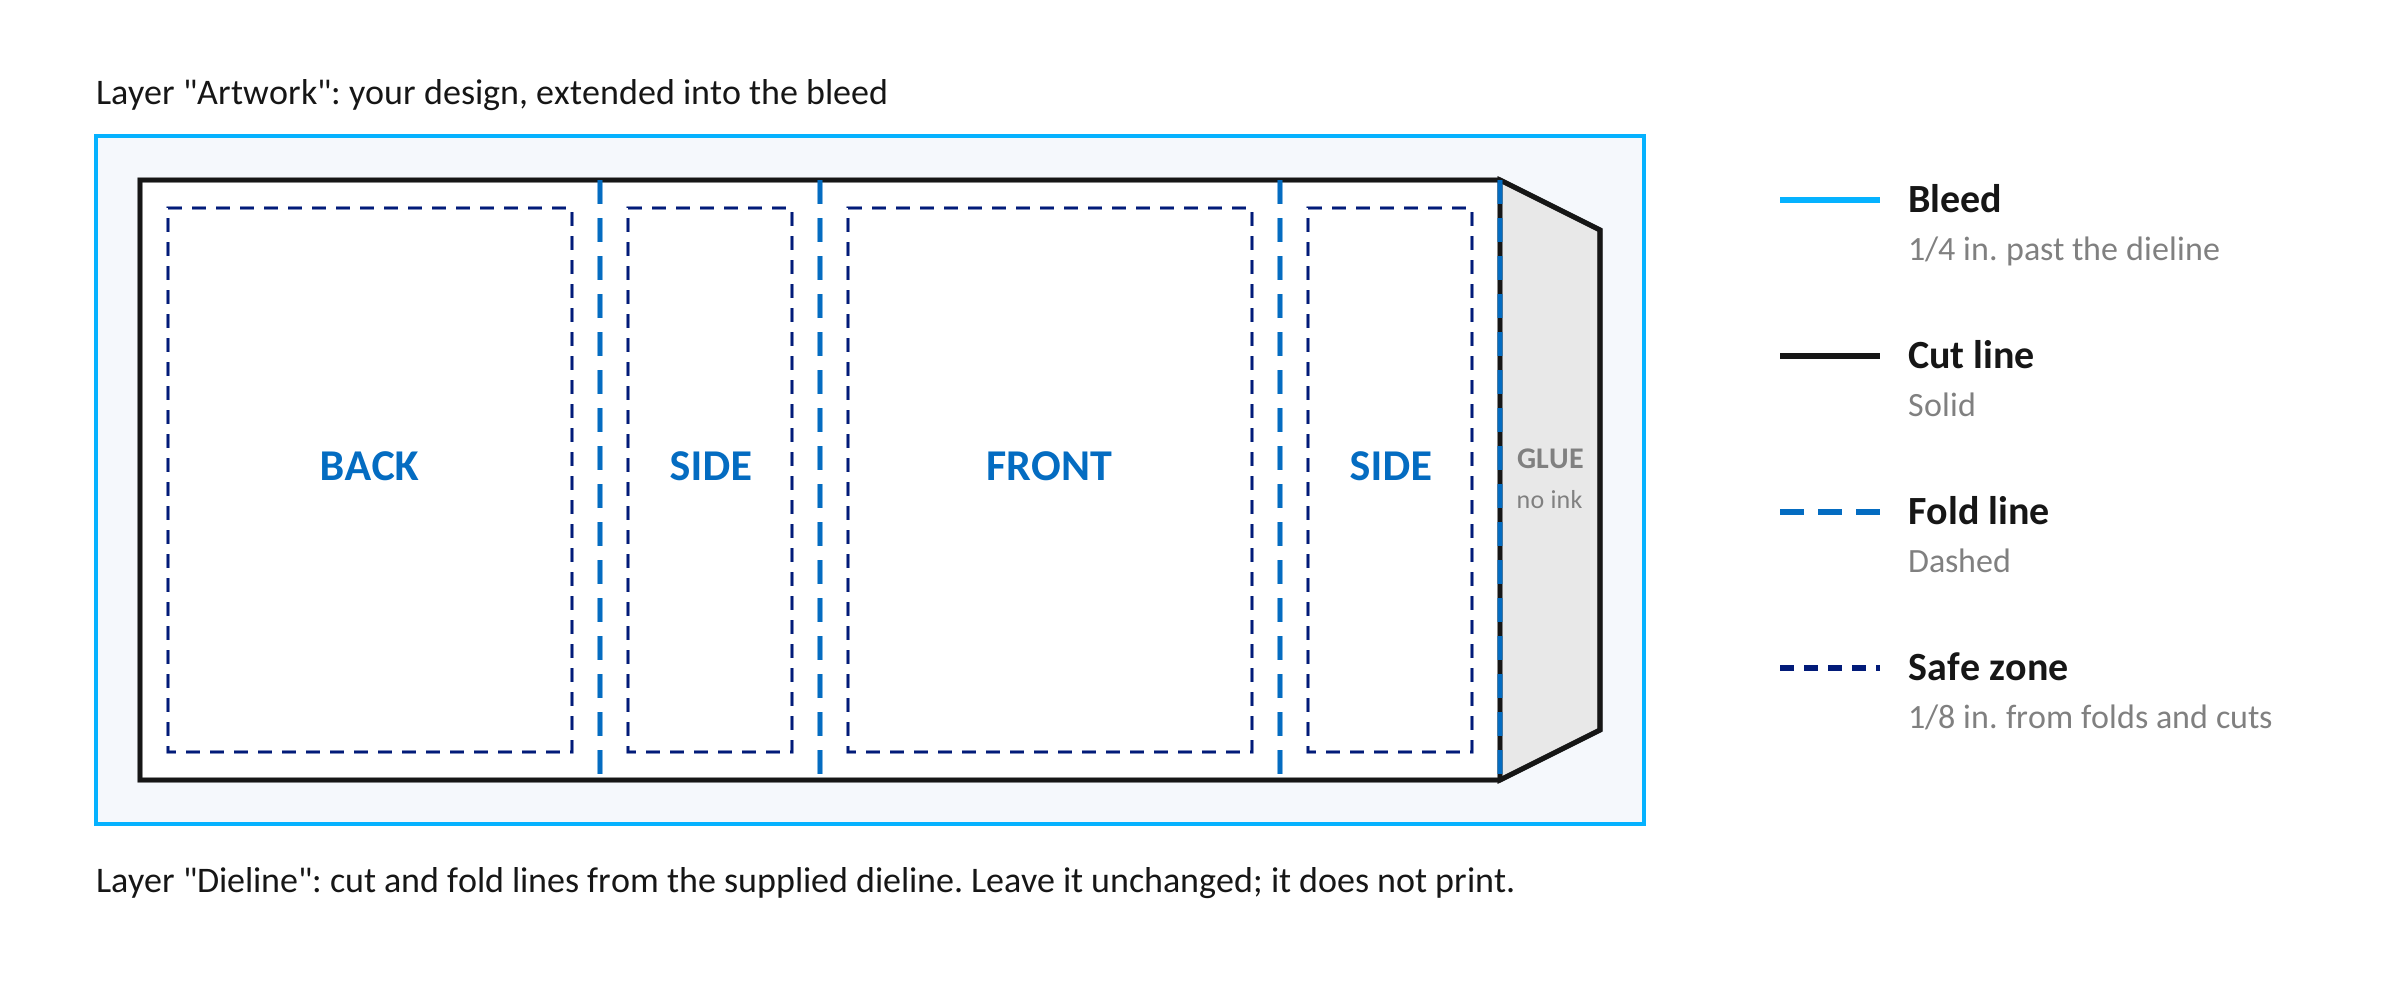
A physical proof on the production board is worth doing for the first run of any sleeve. Screen color and folded geometry are the two things a digital proof cannot settle.
Working on a dieline
A dieline is a flat map of a three-dimensional package. It shows where the board is cut, where it folds, and which panel ends up where once the piece is assembled. It is a guide for production, not a printed element. These are the habits that keep a dieline job moving.
Treat the dieline layer as read only
Place your design on its own layer above the dieline and leave the dieline itself untouched. Moving, recoloring, or deleting those lines removes the only reference the die maker and the press operator have. If a panel looks like it needs to change size, that is a conversation with Supera, not an edit to the file.
Design for the folded piece, not the flat one
Panels that sit side by side on the flat sheet can end up on opposite faces of the finished package, and a panel can end up upside down relative to its neighbor. Print the dieline at full size, fold it by hand, and look at it. Two minutes of paper folding catches orientation errors that no on-screen check will.
Build color in CMYK from the start
Set the document to CMYK rather than designing in RGB and converting at the end. RGB covers colors that four-color process printing cannot reach, so a late conversion shifts the brightest parts of a design in ways nobody chose. If brand color accuracy matters, specify the Pantone C code and say so at submission rather than trusting an on-screen match.
Carry artwork past every cut and fold
Anything that should reach the edge of the finished piece has to extend past the cut line. At a fold, carry the artwork through into the adjacent panel so a small shift in folding does not expose an unprinted line at the crease.
Hold important content back from the edges
Text, logos, and anything a patient has to read belong inside the safe zone, away from cuts and folds. A line of type that crosses a crease becomes hard to read once the piece is assembled, which matters more on an at-home testing kit than on most packaging.
Give finishes their own layer
Foil, spot UV, embossing, and debossing are separate operations with separate tooling. Put each on a clearly named layer so the finisher can see exactly where it applies without interpreting your intent from the artwork.
Label the faces
Mark each artboard or panel group as inside or outside. On a sleeve or a folding carton this removes the most common source of assembly confusion.
Embed, outline, and check resolution
Embed every linked image so nothing goes missing in transit. Outline type, or embed the fonts, so the file does not depend on what is installed at the print shop. Keep photographs at 300 ppi or better at final printed size, and keep logos, type, and line art in vector so they stay sharp at any size. Reserve JPG and PNG for photography.
Mind the small type
Six point is the practical floor for printed type on kit packaging. Anything smaller needs a feasibility check with the printer before it is designed in, particularly on uncoated board where ink spreads slightly into the fiber.
Send a layered file
Deliver a layered Illustrator file or an editable PDF rather than a flattened export. Flattening removes the layer separation that the die maker, the press operator, and the finishing team each depend on.
For more on how color choices land on a quote, see CMYK or Pantone. For how board choice changes what a dieline can do, see choosing box material for a collection kit.
IFUs and inserts
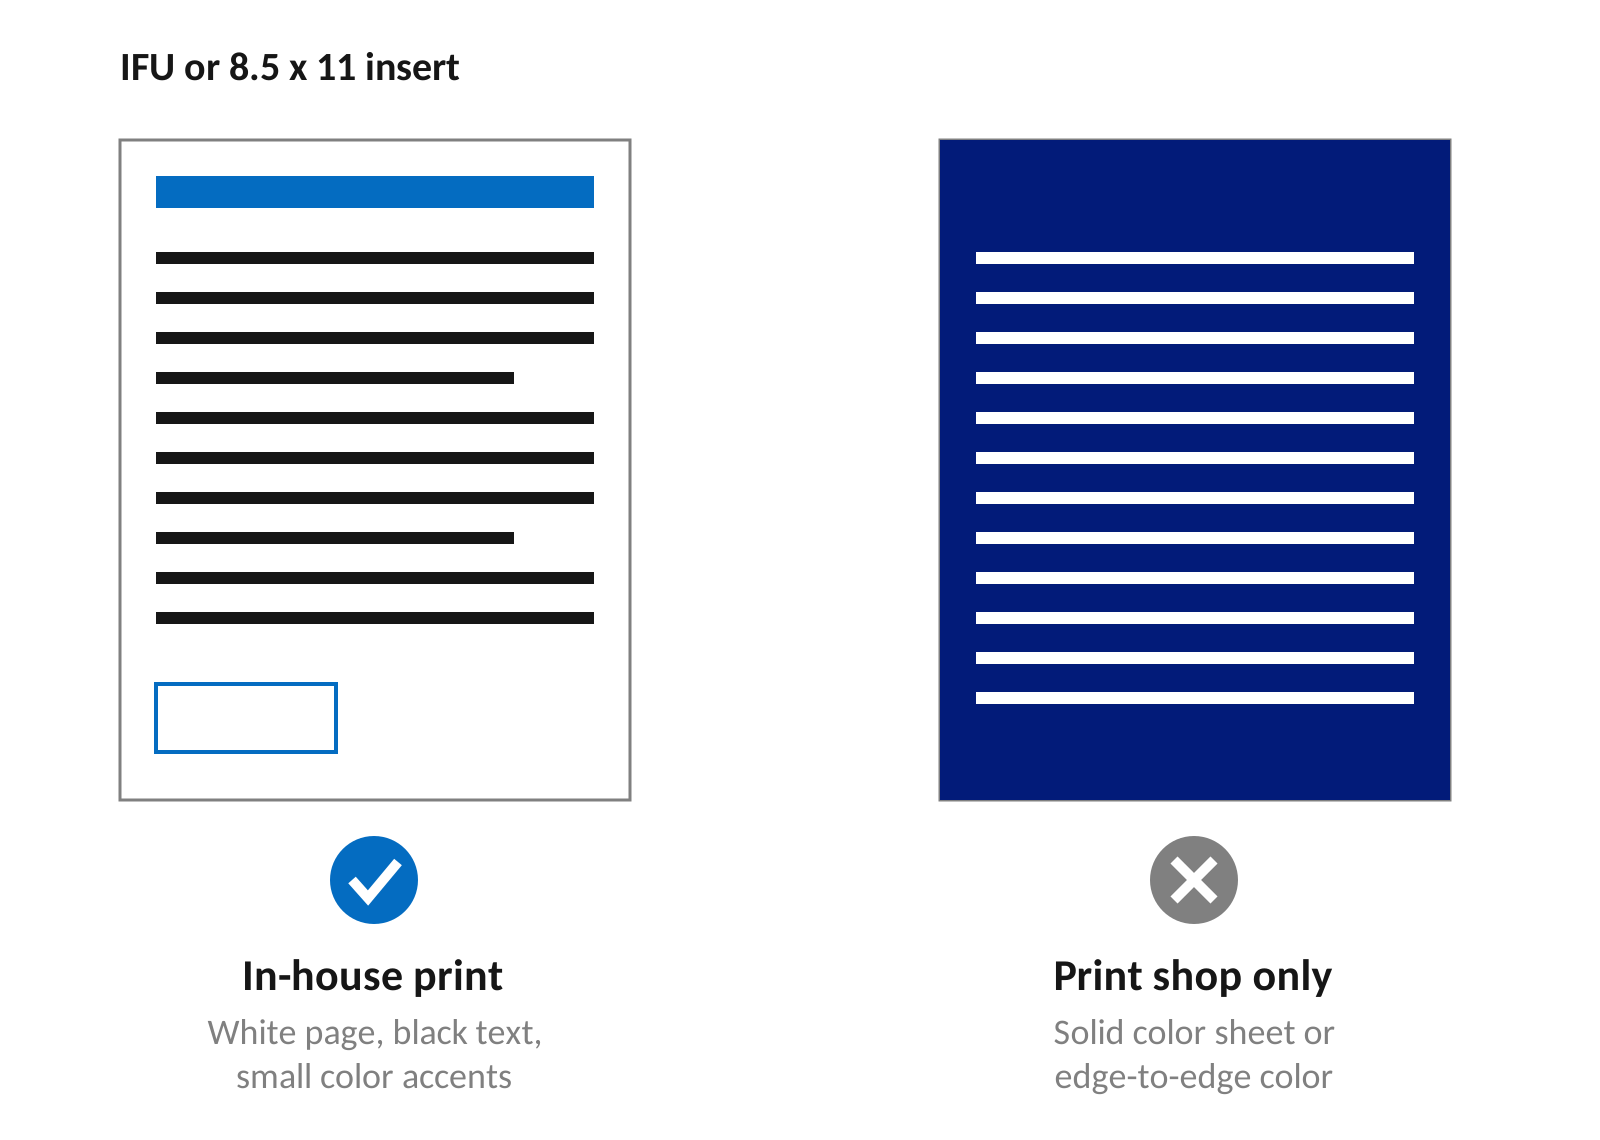
Instructions for use and 8.5 x 11 inserts follow one of two paths, and the path changes the design rules. Supera prints simple, low-coverage pieces in house. Die-cut cards, full-bleed pieces, and heavy color designs go to a print shop.
In-house print
| Specification | In-house IFU or insert |
|---|---|
| Finished size | 8.5 x 11 in. flat. Supera sets the fold to fit the kit and provides the fold layout on request. |
| Bleed | None. In-house pieces do not print edge to edge. |
| Safe zone | 0.25 in. margin on every side, with text kept clear of fold lines. |
| Background | White. No full-page or large solid color backgrounds, and no solid color panels behind body text. |
| Color use | Color for text, logos, line art, icons, and small accents such as a thin header bar or a callout outline. Large solid fills print unevenly and slow the job. |
| Images | Keep photos small and few. Line drawings and simple step illustrations print best. |
| Body text | Black at 100% K, not a color and not a rich black. 8 pt minimum. |
| Resolution | 300 ppi for images. Text as live or outlined type. |
Print shop
| Specification | IFUs, inserts and cards: print shop |
|---|---|
| Finished size | Set by the dieline for the card or insert. Die-cut pieces always need a dieline. |
| Bleed | 1/8 in. past the trim or die line on every edge. |
| Safe zone | 1/8 in. inside the trim or die line, and clear of folds. |
| File format | Print-ready PDF (PDF/X-1a or PDF/X-4) with bleed and crop marks, or packaged AI or INDD. |
| Layers | Dieline on its own non-printing layer named Dieline. Finishes on a separate layer. |
| Resolution | 300 ppi minimum at final size. Logos and text in vector. |
| Color | CMYK. List Pantone C codes for any spot color. Full color and solid backgrounds are fine. |
| Minimum type | 6 pt, with 8 pt recommended for body text. |
If a design needs edge-to-edge color, a solid background, heavy photography, or a die-cut shape, say so at submission so it can be routed and quoted as a print shop piece.
Before you send
- File is a print-ready PDF, or a packaged AI or INDD with fonts and links
- Built at the finished size on the supplied template or dieline
- White box logo label: 5 x 3 in. landscape, 5.125 x 3.125 in. with bleed, 600 ppi
- Bleed and safe zone match the specification for this item
- In-house IFU or insert: white background, low color coverage, no bleed
- Print shop piece: 1/8 in. bleed, crop marks, and dieline layer included
- CMYK color, with spot colors listed by Pantone number
- Images at the required resolution, fonts outlined or embedded
- Reserved variable data area left blank
- Content and regulatory text reviewed and approved by your team
- File named Company_Kit_Item_RevN
- No patient information in any file
Proof and approval
Supera issues a proof for every new or changed item. Production starts after you approve that proof in writing for that item and revision. Any change after approval means a new proof at the next revision, and the approved proof is kept with the kit production records.
What this check does and does not cover. You are responsible for the accuracy of all text, claims, symbols, and regulatory content on your artwork unless your program agreement assigns labeling responsibility to Supera. Files are checked against this print specification and against the approved kit build. A print specification check is not a regulatory review.
Request your label template or dieline
Ask for the template or dieline for your kit before design starts. It sets the finished size, the panel layout, and the reserved area for variable data, and it is the difference between a file that proofs on the first pass and one that gets rebuilt.
Email clientservice@superafulfillment.com with your kit name and the item you are designing.
Dieline library
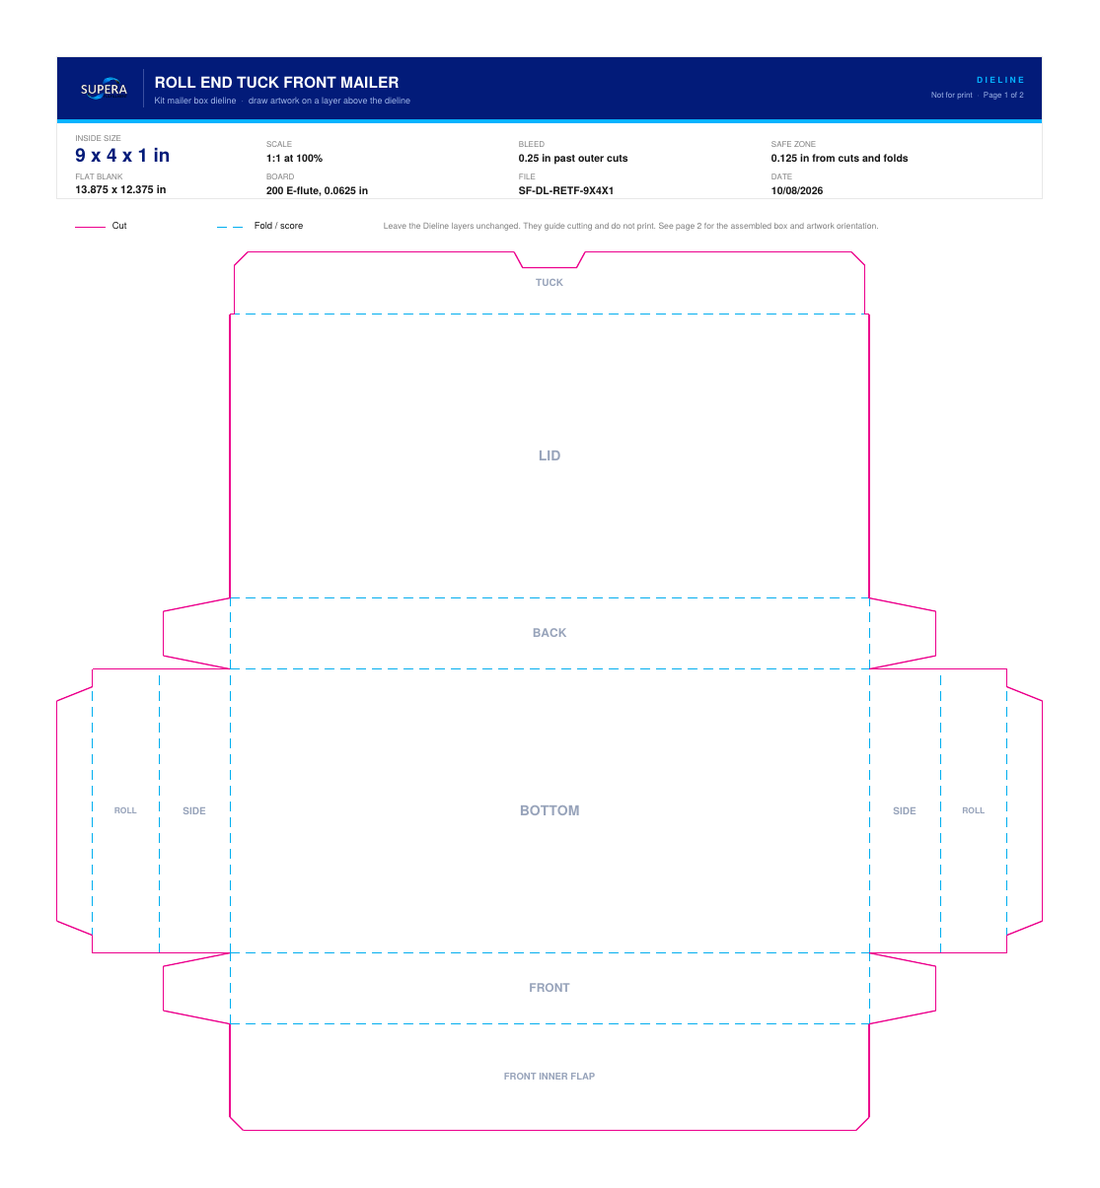
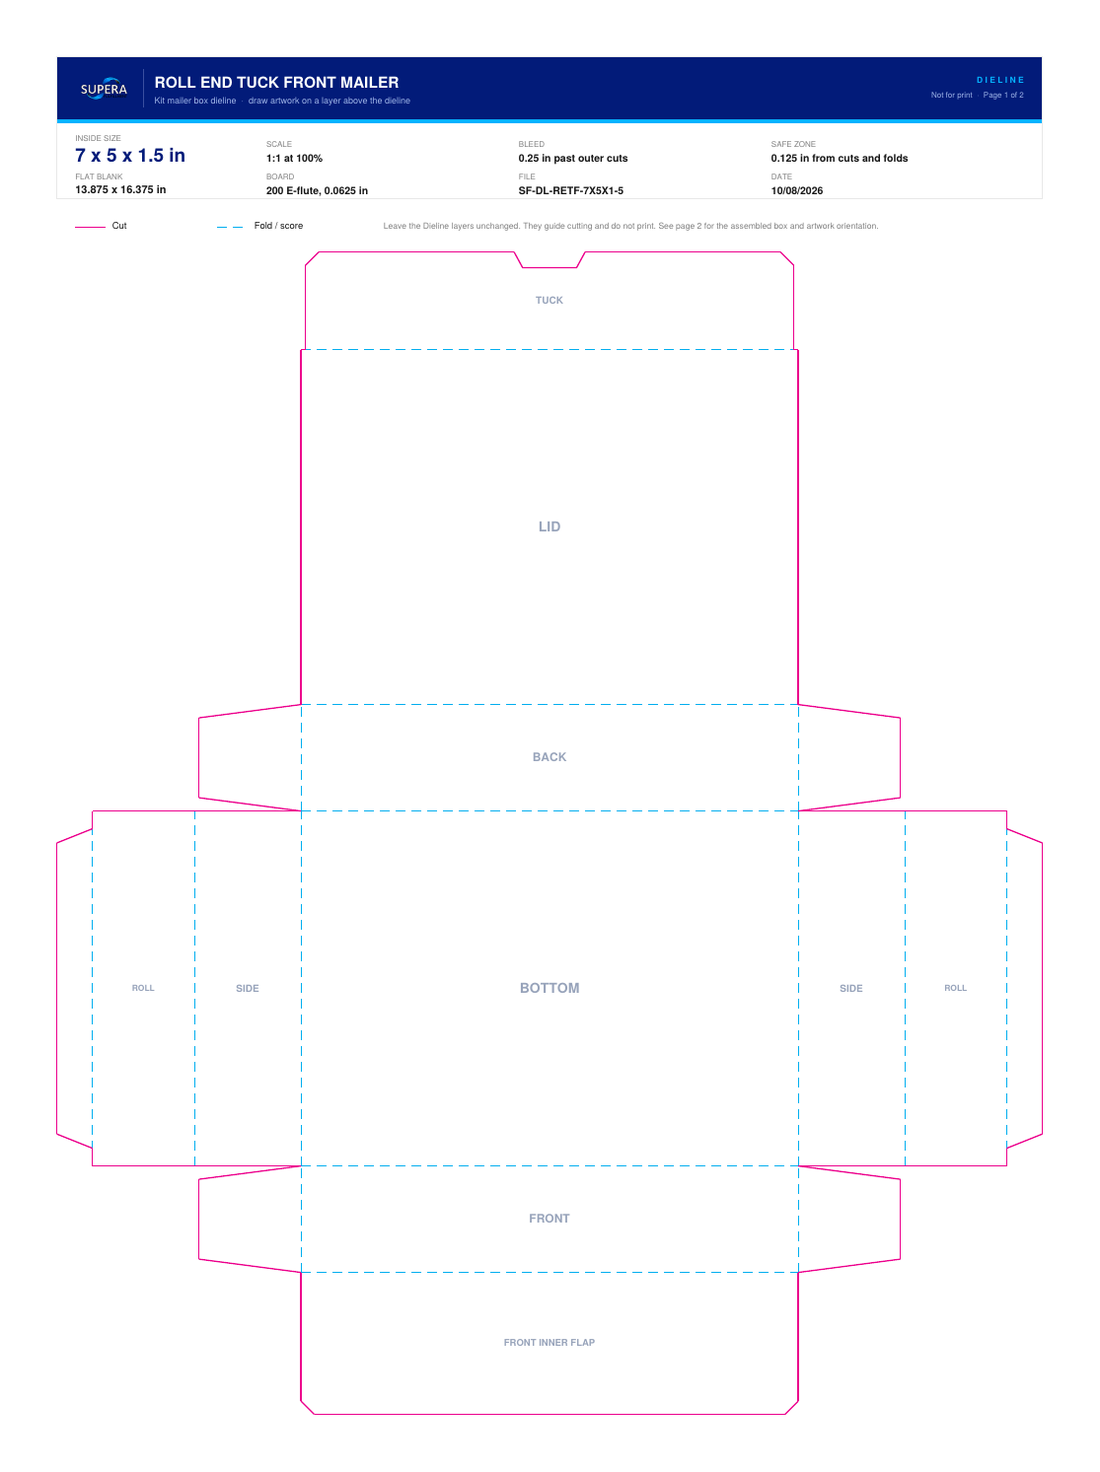
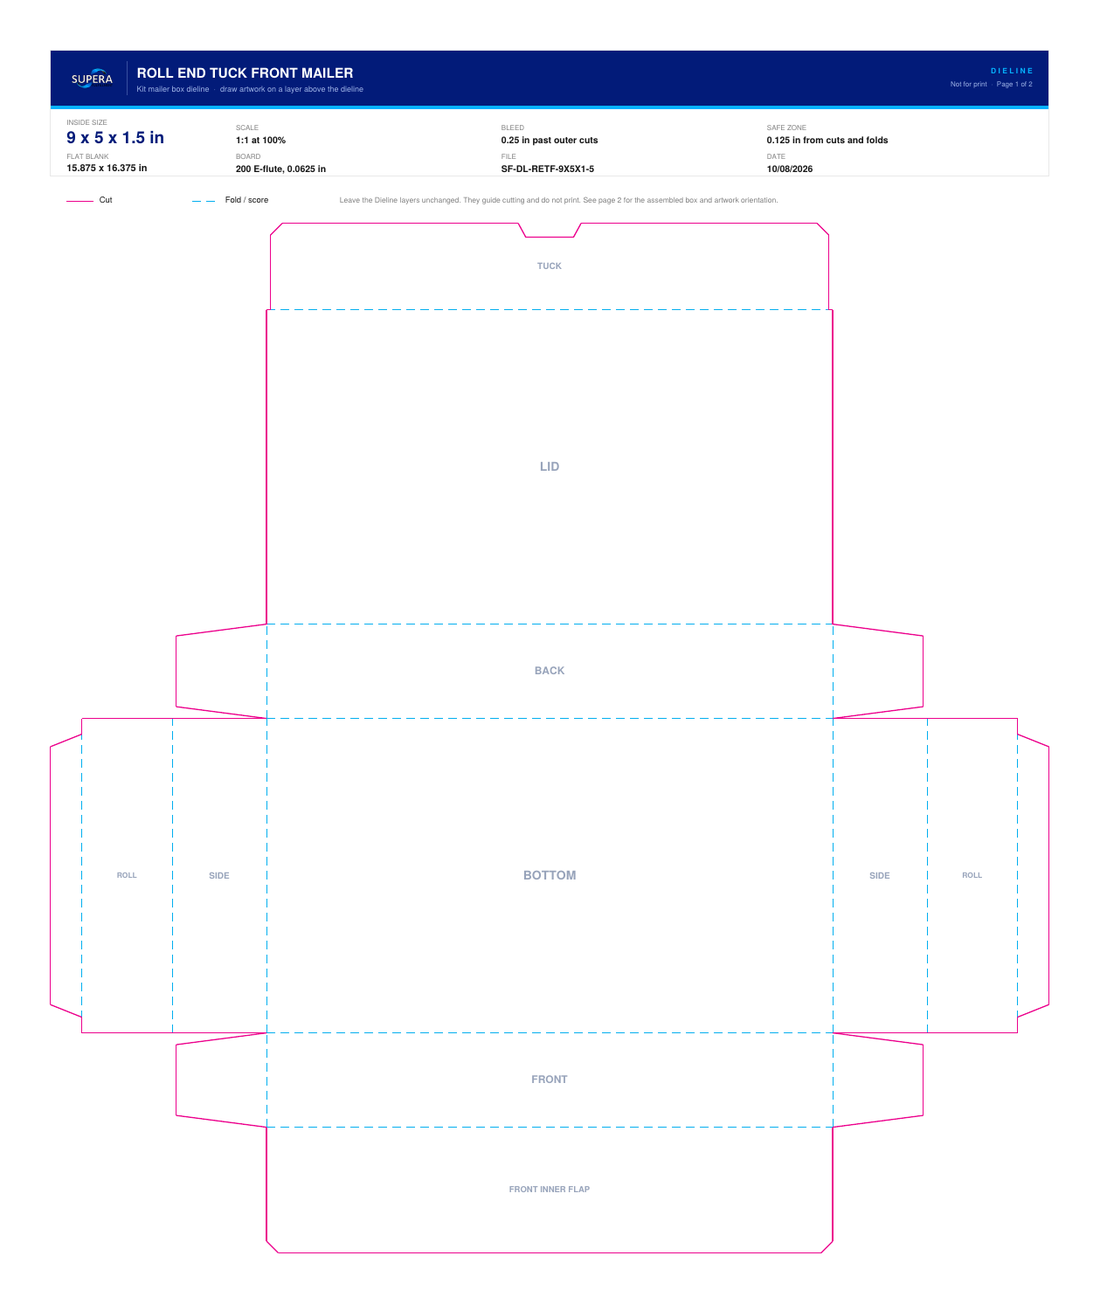
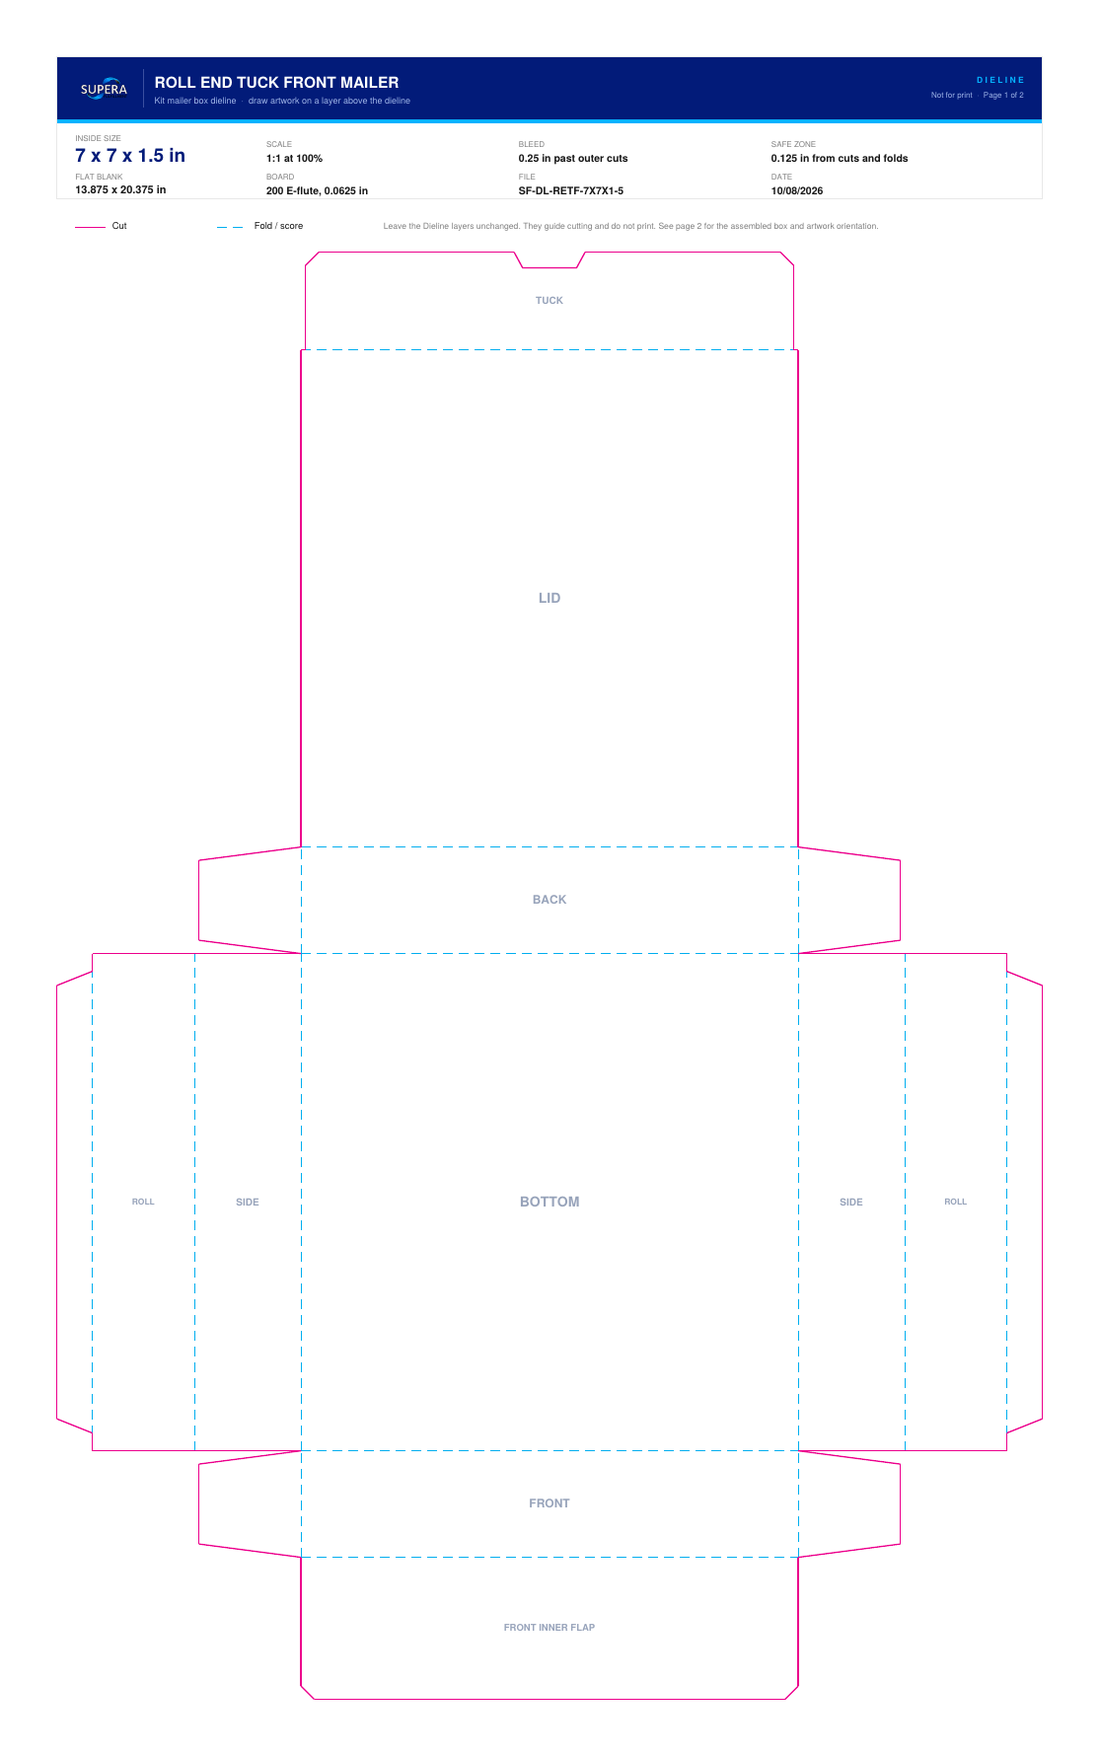
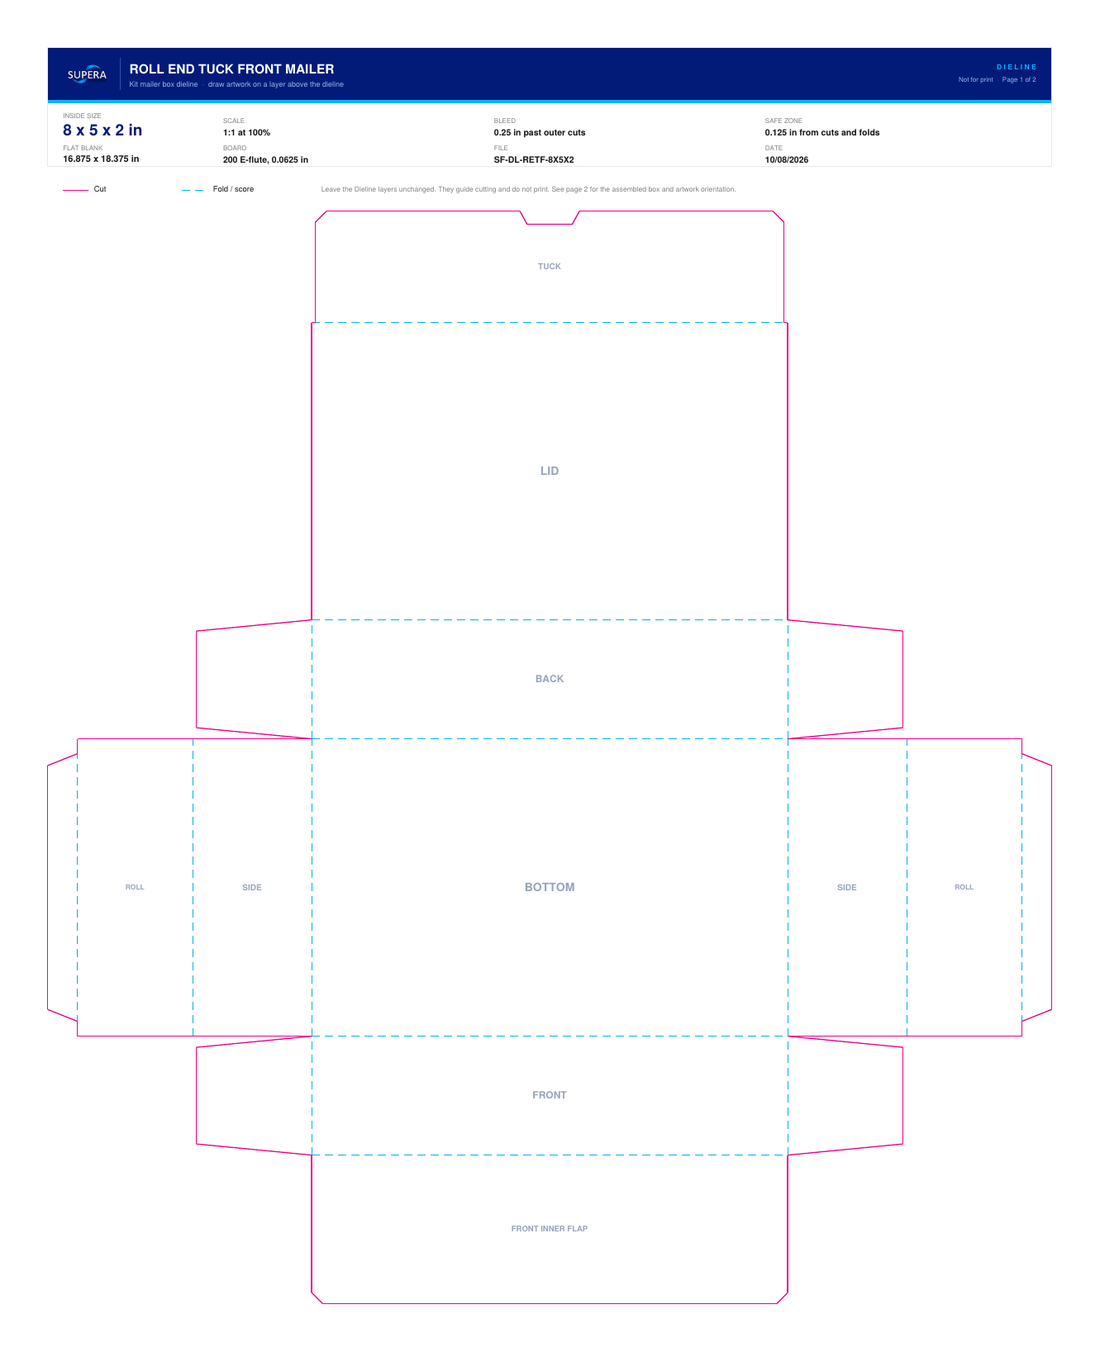
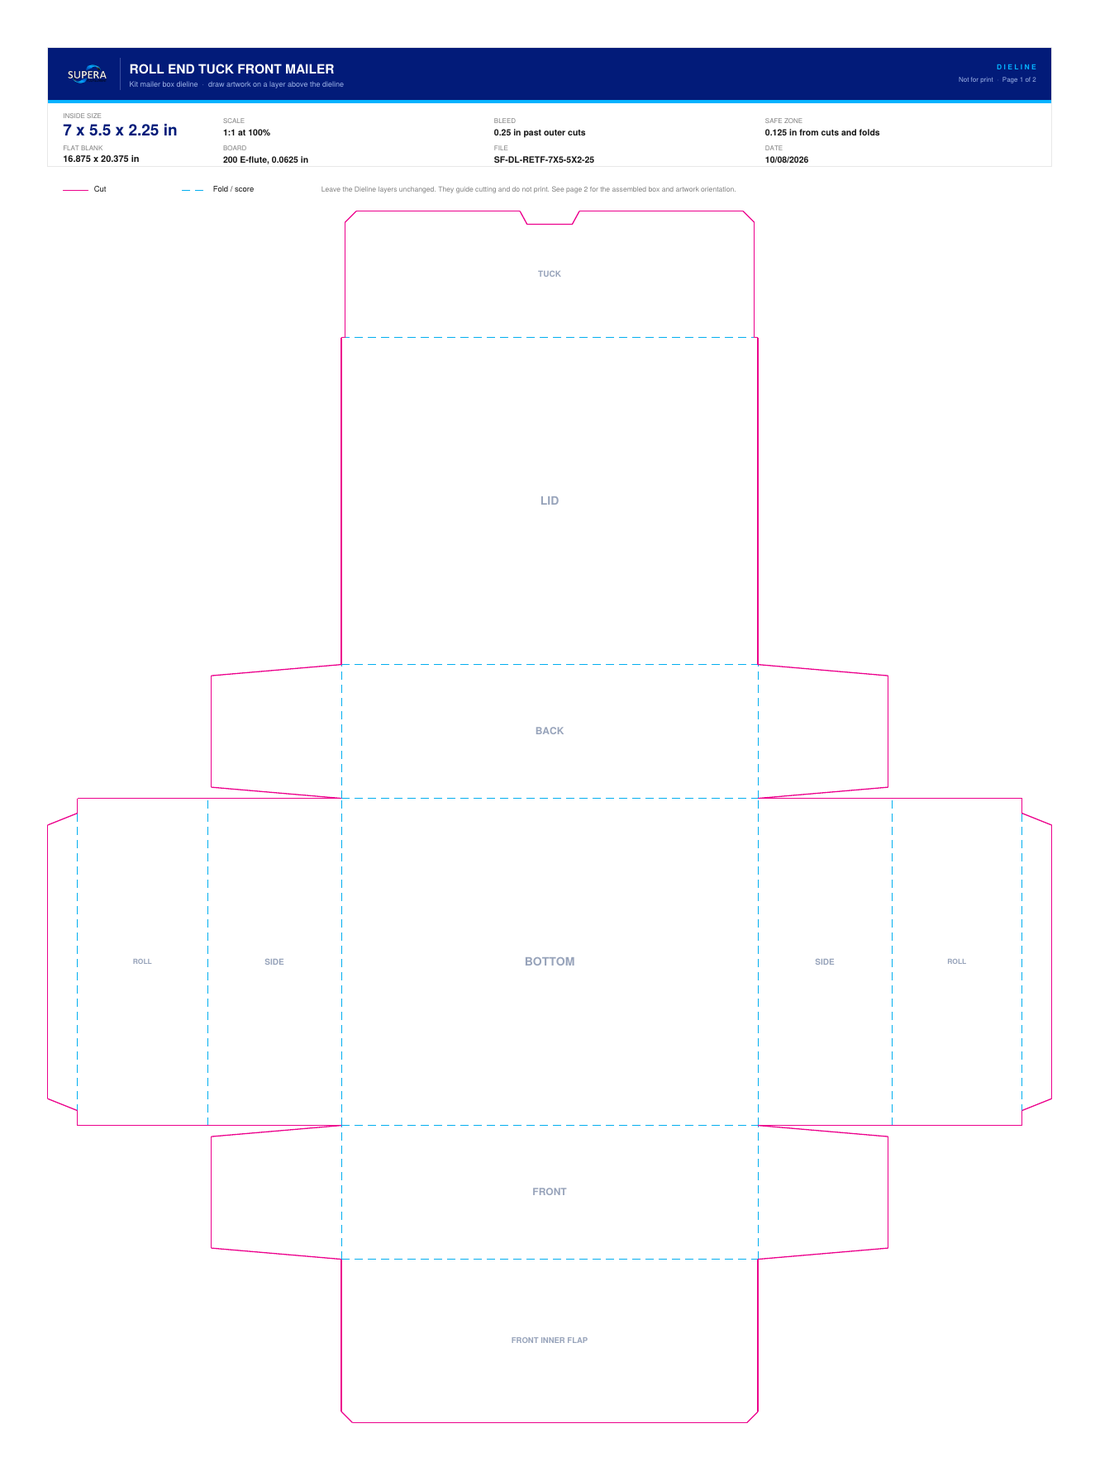
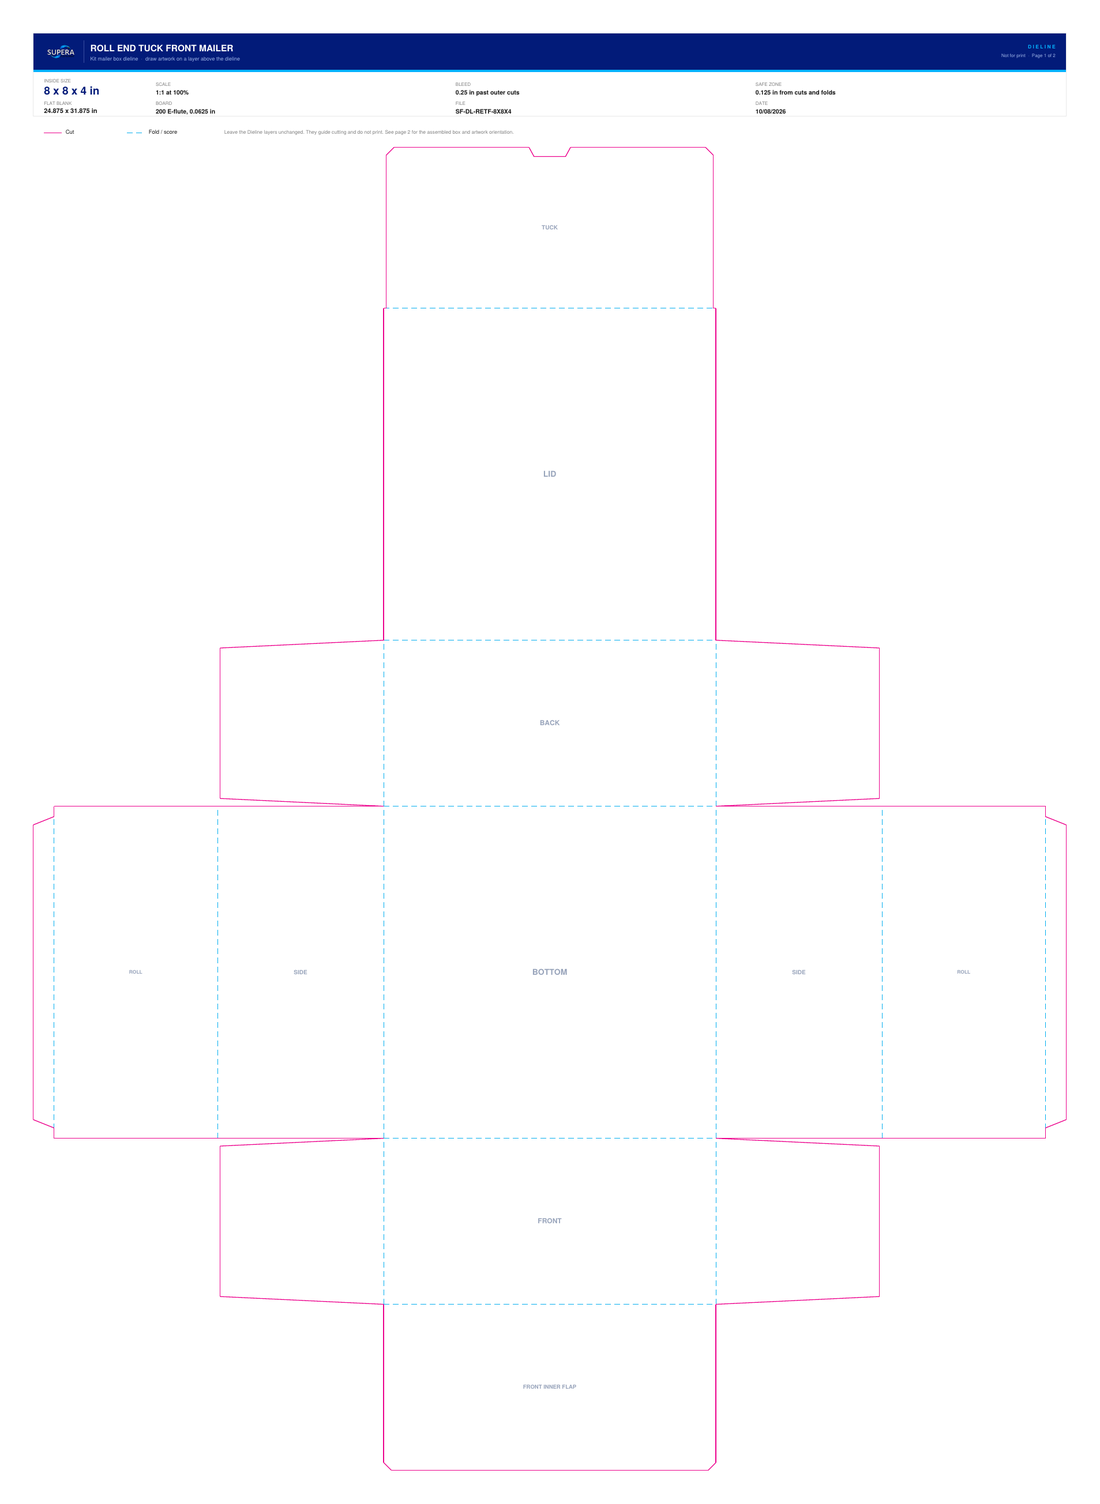
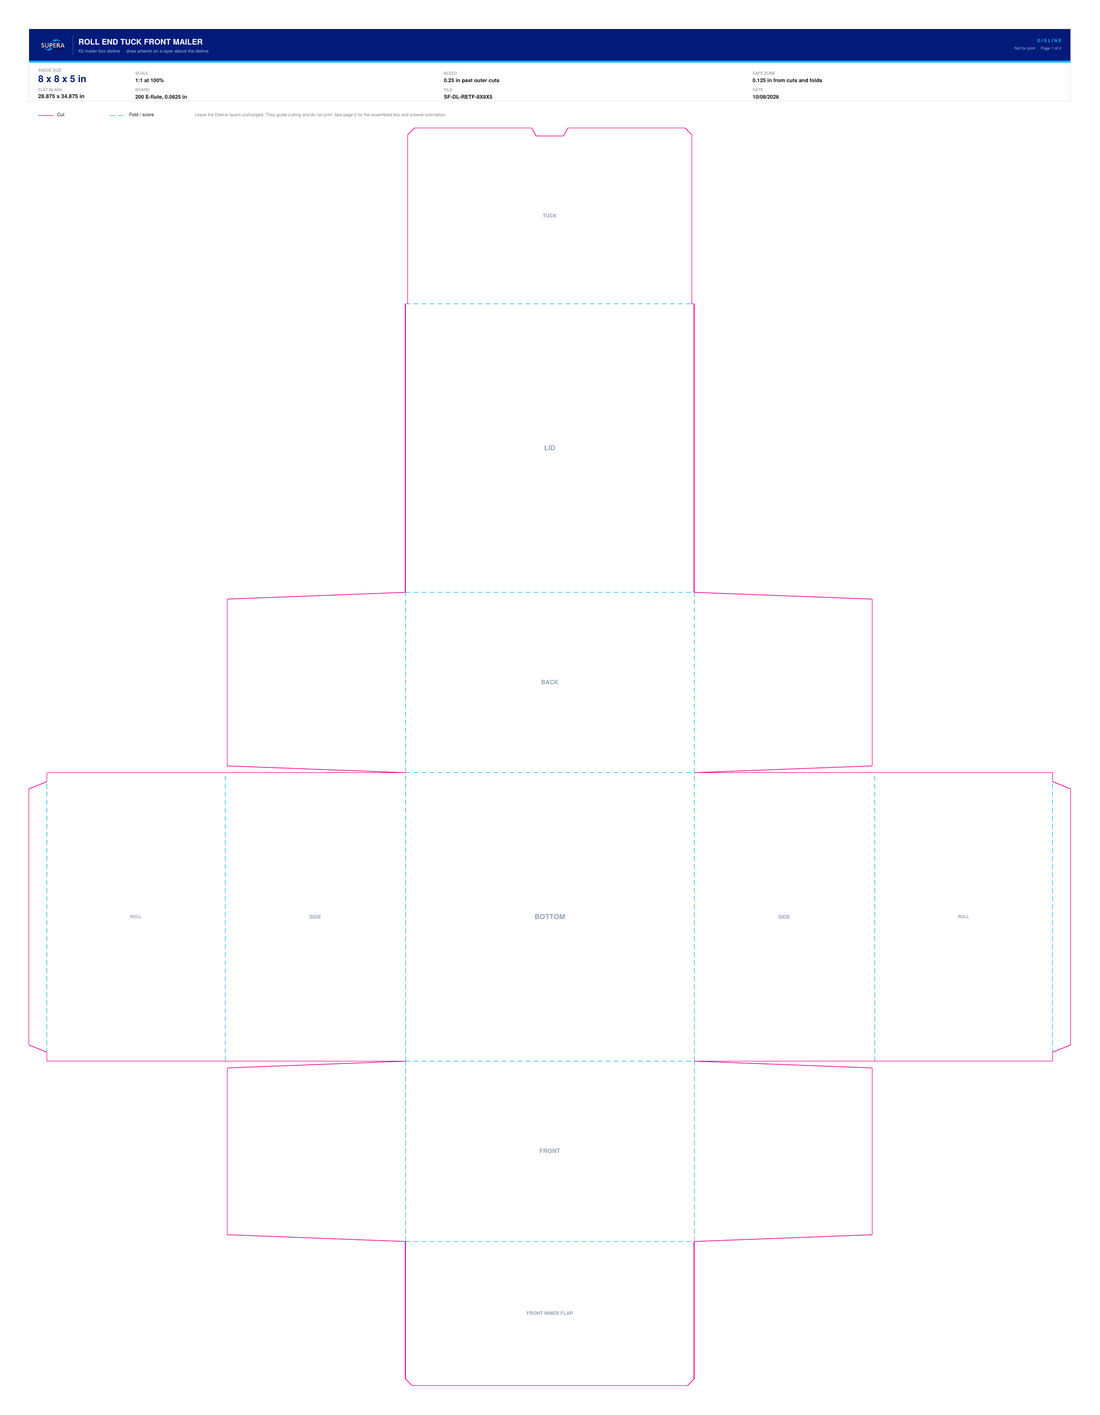
Mailer box dielines in the sizes Supera builds most often, free to download. Each file is drawn at 1:1 scale with cut and fold on separate layers, the bleed and safe zone called out, and a Supera title block. The SVG opens in Illustrator with the layers already named, so you can drop artwork straight onto the Artwork layer.
All eight are roll end tuck front construction. The side walls roll to a double thickness, the front and back wall tabs are captured inside the roll, and the lid tucks into the front inner flap. It holds together without tape or glue, which is why it suits an at-home testing kit a patient opens and then closes again for the return trip.
Before anything is tooled. Allowances in these files assume 200 E-flute at 0.0625 in caliper, which covers most printed kit boxes. Confirm caliper and allowances with your converter. If your box is not one of these sizes, ask for the dieline matched to your program.
9 x 4 x 1 inFlat single-device kits
A swab or collection card, an IFU, and a return mailer. The shallowest box in the set that still protects a device in transit.
7 x 5 x 1.5 inCompact swab and card kits
Room for a device, a small tube, and folded instructions without the contents shifting in transit.
9 x 5 x 1.5 inSaliva and DNA collection kits
Fits a collection device, a stabilizing tube, an instruction sheet, and a flat return mailer.
7 x 7 x 1.5 inSquare shallow mailer
Suits a round or awkwardly shaped device that wastes space in a rectangle, and gives a square front panel for artwork.
8 x 5 x 2 inMulti-component kits
Depth for a specimen container, absorbent material, a secondary bag, and a return sleeve.
7 x 5.5 x 2.25 inTissue and container kits
A deeper box for a rigid specimen container plus cold chain or absorbent material.
8 x 8 x 4 inBottle and tube packs
Takes a cell divider for filled tubes or bottles, or a bulkier device with accessories.
8 x 8 x 5 inInner pack with divider
The deepest box in the set. Built around a cell divider or a tall collection device.
Other constructions
Supera also builds kits in box sleeves and in magnetic closure rigid boxes. Those are tooled per program rather than drawn from a standard library, because the wrap, the wall thickness, and the magnet placement all follow what goes inside. Email clientservice@superafulfillment.com with your kit contents and we will send the dieline for your build.
Related guides
Packaging resources
The full set of packaging guides, box styles, and the order the decisions actually come up in.
Box materials
What E flute, SBS, and chipboard do, and the four packaging tiers from a stock box with a label through a rigid setup box.
Color and ink count
Process versus spot color, what one through four color printing means on a quote, and how substrate and coating change the result.
What a printer needs
Why print jobs stall, what a dieline does not control, and how barcodes and variable data are handled.